Vehicle History
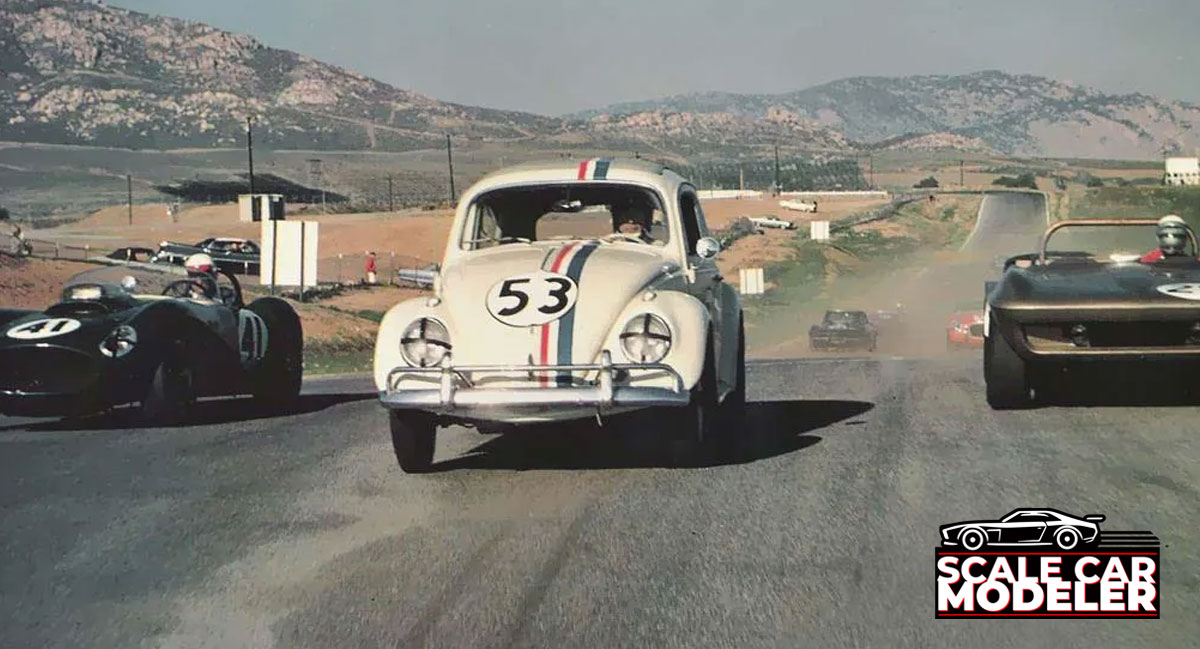
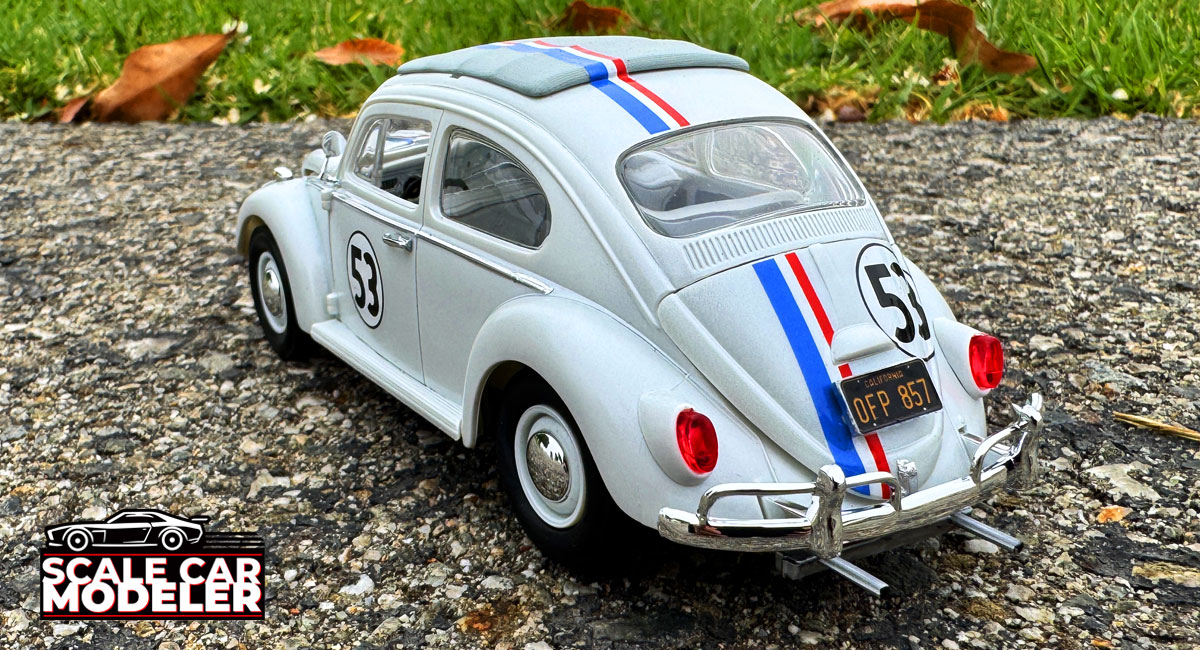
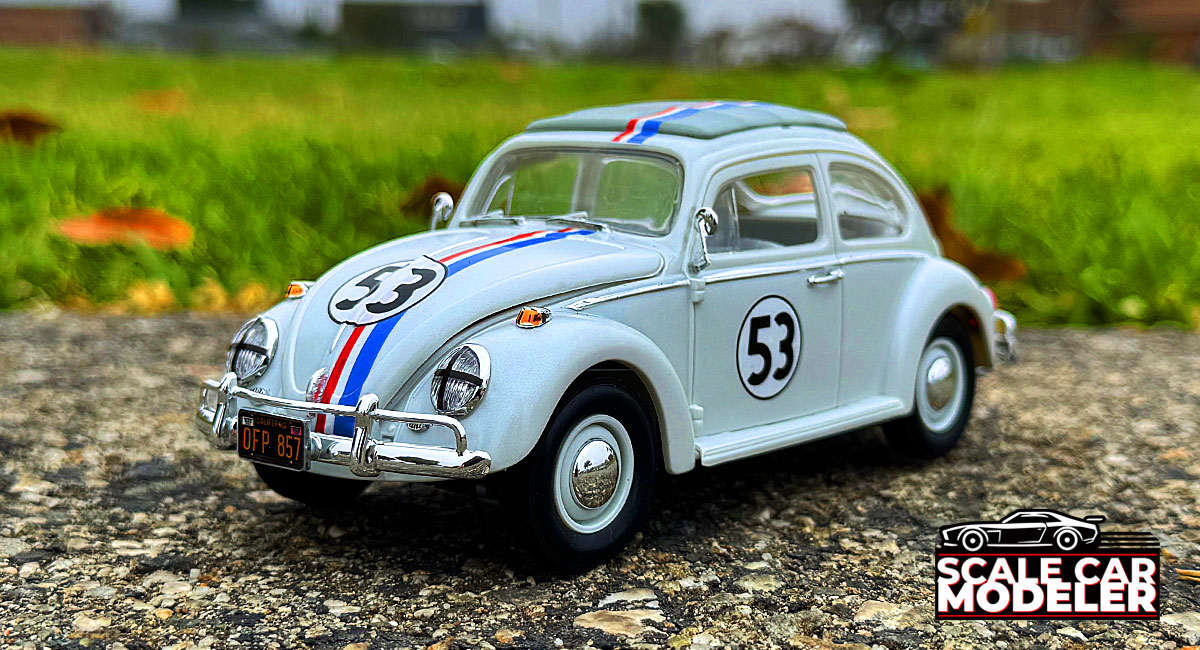
Herbie the Love Bug is one of the most iconic cars in cinematic history—a 1963 Volkswagen Beetle with a mind of its own. First appearing in Disney’s 1968 film The Love Bug, Herbie quickly became a beloved character, starring in multiple sequels and even a 2005 reboot, Herbie: Fully Loaded, featuring Lindsay Lohan. Known for his distinctive racing livery—pearl white paint, red-white-blue racing stripes and the number 53—Herbie’s personality was full of charm, loyalty and an occasional mischievous streak. The original films portrayed him as a sentient car that could drive itself, win races and even fall in love, capturing the hearts of both kids and adults alike.
The primary car used for Herbie was the 1963 Volkswagen Type 1 Beetle, selected for its round, friendly shape and widespread popularity in the 1960s. While many different Beetles were used across the films for various stunts—some modified with Porsche engines or hydraulic systems—most retained the classic look with minor mechanical tweaks. The Beetle itself has a long and storied history, originally designed in the 1930s by Ferdinand Porsche and later becoming a symbol of practicality and counterculture in the U.S. during the 1960s and 70s. With over 21 million units built, the Volkswagen Beetle became one of the best-selling cars of all time. Herbie helped solidify its status not just as a car, but as a cultural icon.
Kit Overview
Herbie the Love Bug is undoubtedly one of the most iconic movie/TV show vehicles of all time. I actually grew up with Herbie (the later version) and loved the show and the supporting cast - Dean Jones, Michele Lee, Buddy Hackett, to name a few. It was always fun to see the antics Herbie and crew would get themselves in to (and out of).
Over the years, there's been a couple renditions of this bug in plastic, so when I saw that Polar Lights (AKA Round2 Models) was releasing this kit in 1/25 scale, I knew that, at some point, this kit would be in my collection. Long story short, my local hobby shop (Brookhurst Hobbies) had just received their shipment and this was the last one on the shelf. We all know how a situation like that turns out...
One thing to note about this kit is that it actually arrives under Polar Lights 'Snap Kit' category, something I failed to notice on the box, in the description and in my research. I chalk it up to my excited inner child blinding my eyesight momentarily. Was that a problem after purchase? Nah, I figured it would be a fun kit either way that I could add some fun detailing to.
:: Chassis, Suspension and Engine
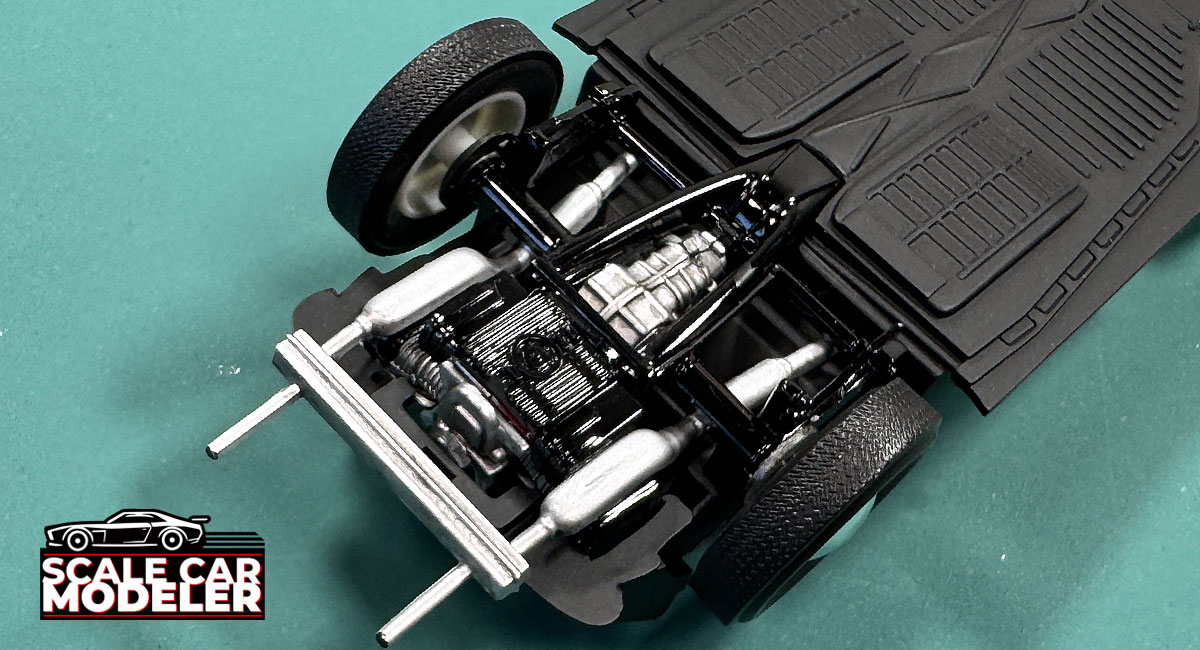
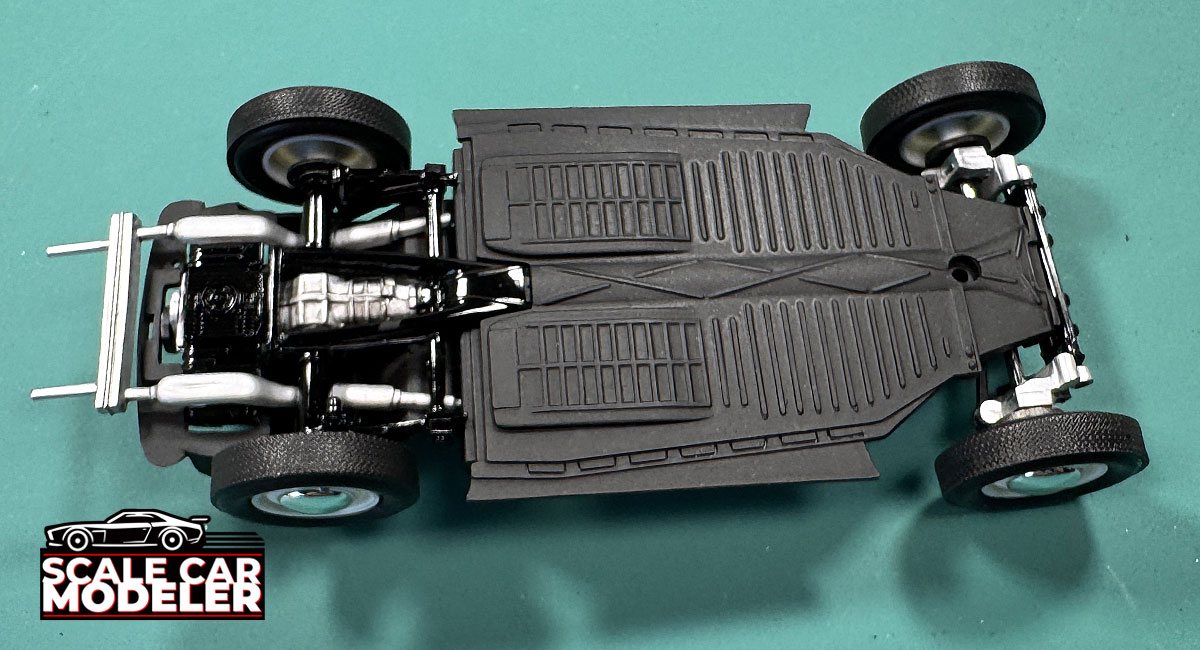 The chassis itself is a nicely molded part, a basic piece that extends from just behind the front suspension all the way back to the motor mounting area. On the top side, there are locating pins and 'bars' for the suspension and interior, while on the bottom is an accurately molded pan with plenty of reinforcement ribbing. There's also a giant hole near the front - I wasn't quite sure what that was for until I read the instructions - that's where the screw goes during final assembly to secure the completed chassis to the body. Not a fan of that hole, however I do understand that, since it's a Snap Kit, some compromises must be made.
The suspension was easy peasy as well. Up front, a standard torsion-bar setup can be found that only had a couple pieces to complete. Paint them separately and press-fit together - no gluing necessary.
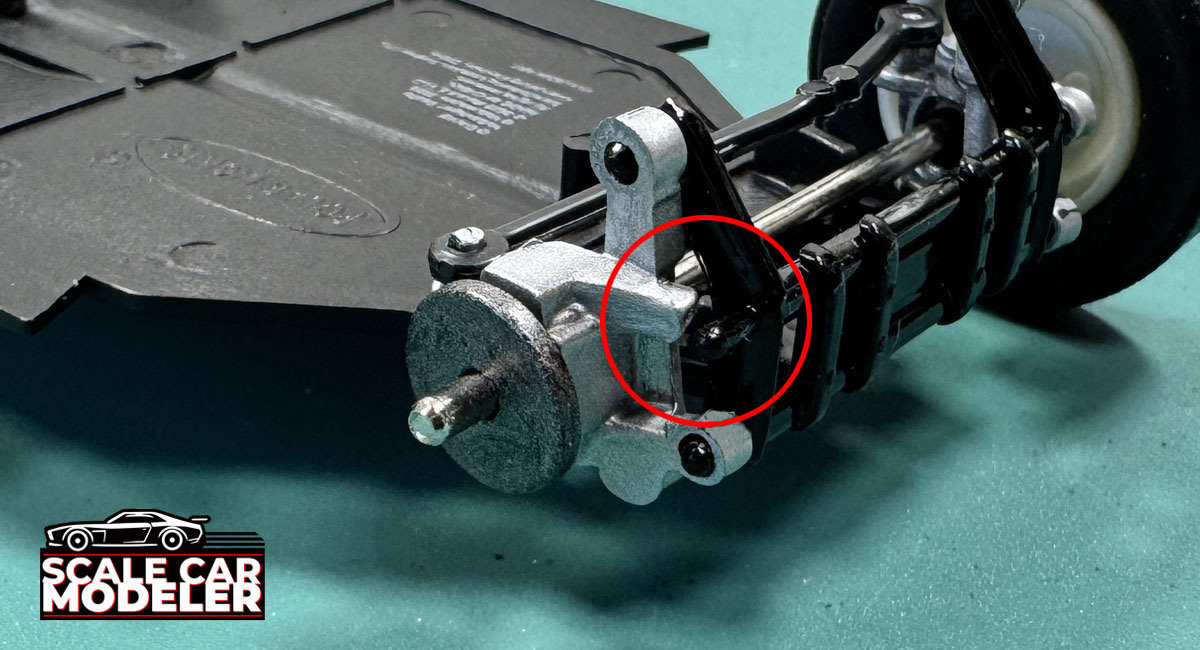 I did, however, run into a couple issues that had to be rectified before proceeding. The first was the front right upright - the actual part was a 'short shot', meaning the part did not get completed during the injection-molding process. There are 3 contact points on this upright that press fit into pins on the torsion suspension. One of them did not fully fill, so my 3-attachment points turned into 2. Now, I'm sure that I could have contacted Polar Lights with a pic and they would have sent me a new part, but I'm quite impatient and I knew that, after final assembly, the front tires would be covering this up - so I just went with it.
The 2nd issue was actually widespread (it applied to almost the entire build) - once you paint your parts, the 'press-fit' functionality of this Snap Kit goes completely south. You see, the way this Snap Kit works is on part tolerances; they're just tight enough to press fit everything together perfectly. However, once you've added paint, those tolerances are way out of whack and parts just don't fit together anymore. So, to correct this, I had to drill out alot of the holes so that parts work together again. Definitely not a fault of PL, but it is something you need to watch out for when building this kit.
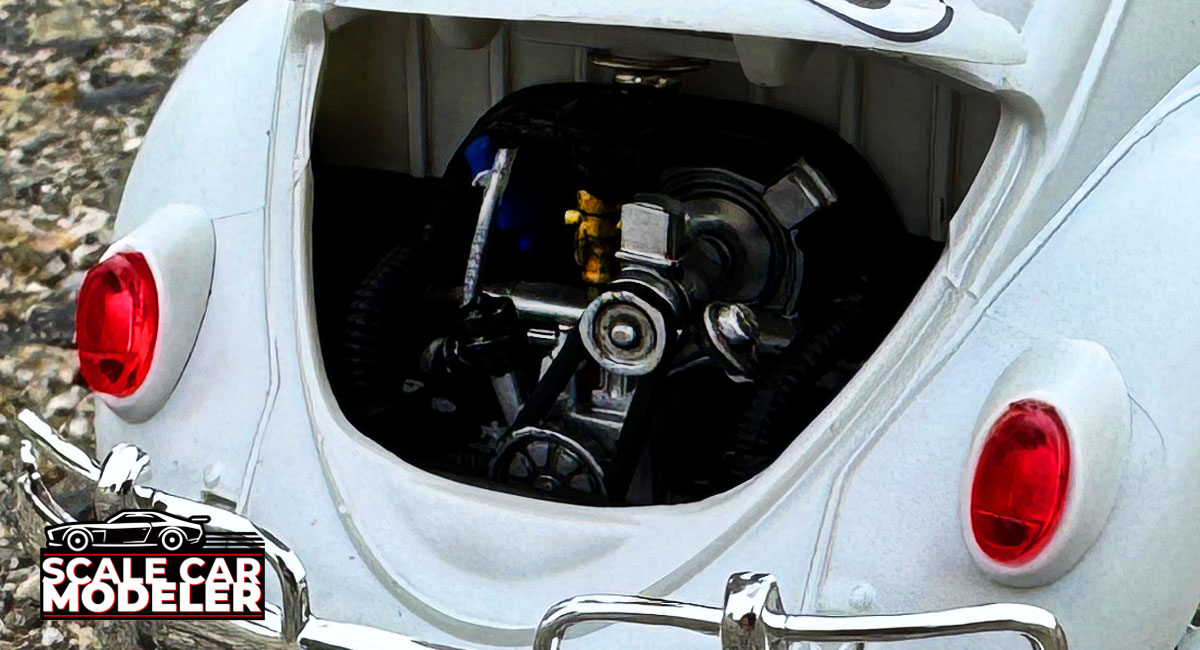
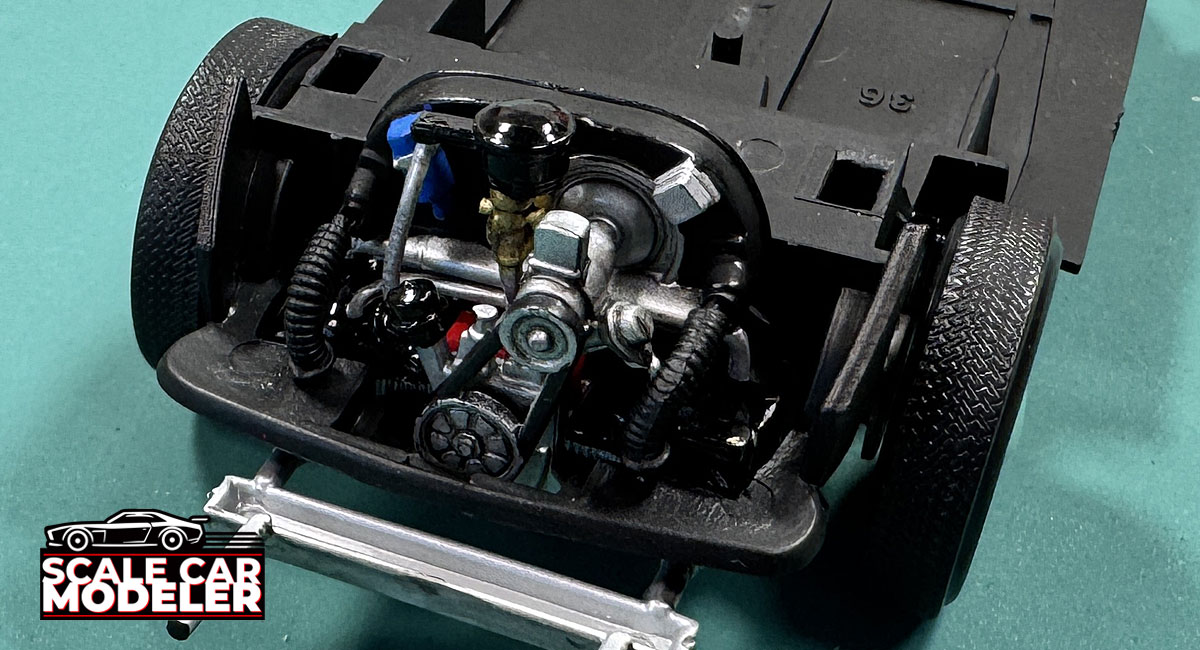 Finally, the engine was a fun little piece of Herbie to build. Parts fitment was fine although the entire assembly did take a little massaging to get it into place. Although it is a Snap Kit, I would advise a little glue here to really help keep things in place. I would also suggest loosely setting the exhaust in place temporarily - the final build step of mating the chassis to the body is going to require you to move it slightly - more on that a little later.
:: Interior
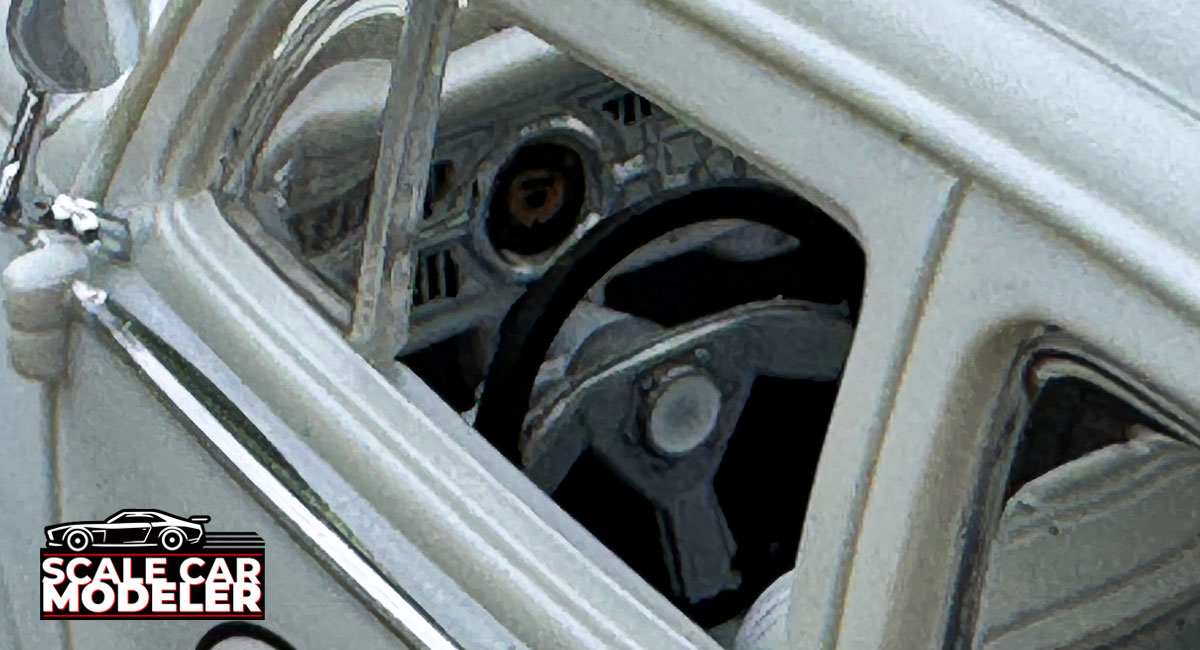
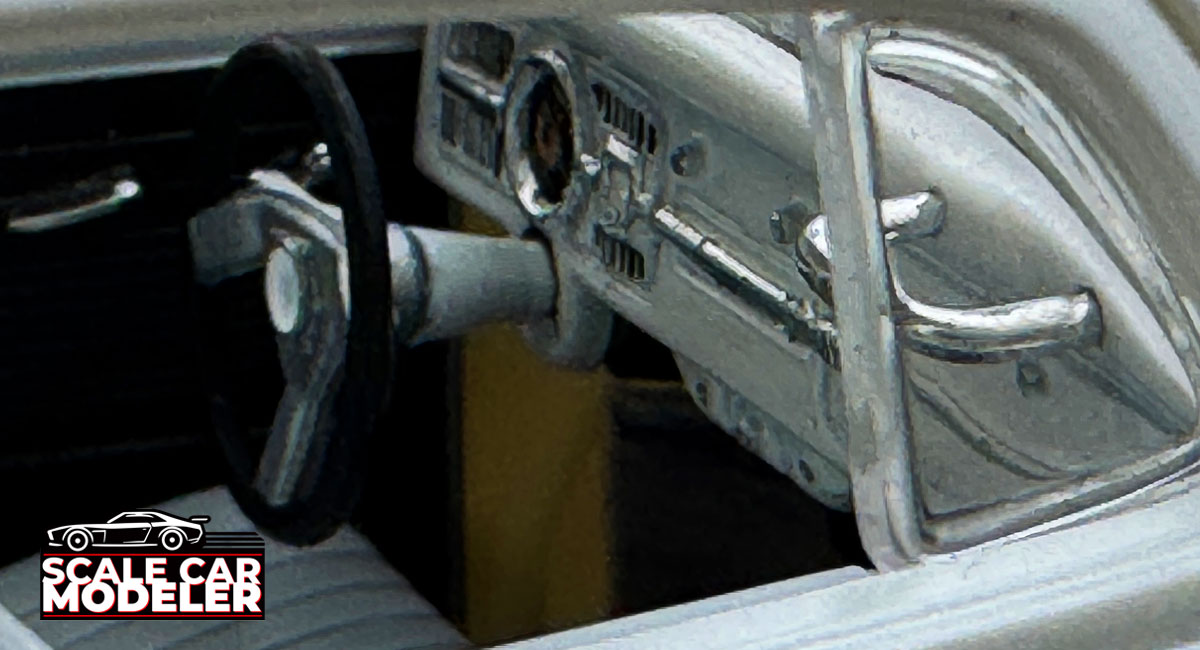
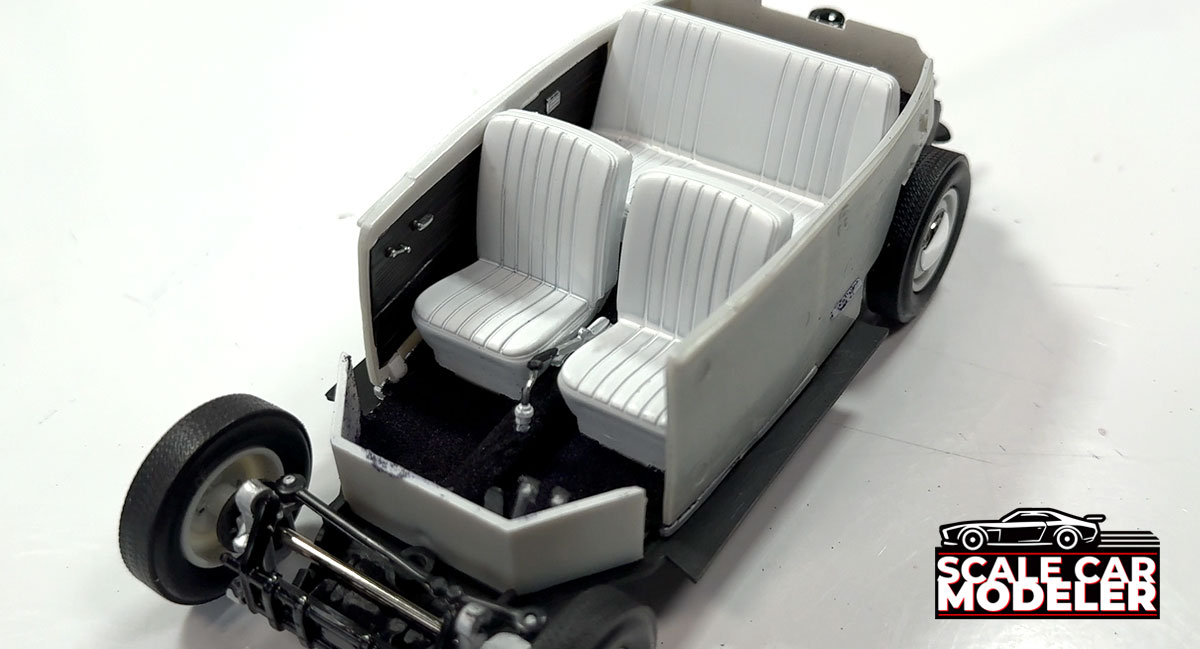 There's not alot going on with the interior of Herbie, however there's not much going on with the real car either, so that makes it pretty accurate. The front and rear seats are two piece units that press fit together. The dash has some decent detail with a separate steering column and steering wheel (PL actually gives you a choice of a stock VW or custom wheel) and there's a separate floor shifter and hand brake. In addition, the interior side panels are separate as well. To spruce things up a bit, I detailed the side panels and added some black 'carpeting'. I also added a little detail to the dashboard, including a strip of Bare Metal Foil. It's just what it needed to complete the look.
:: Exterior
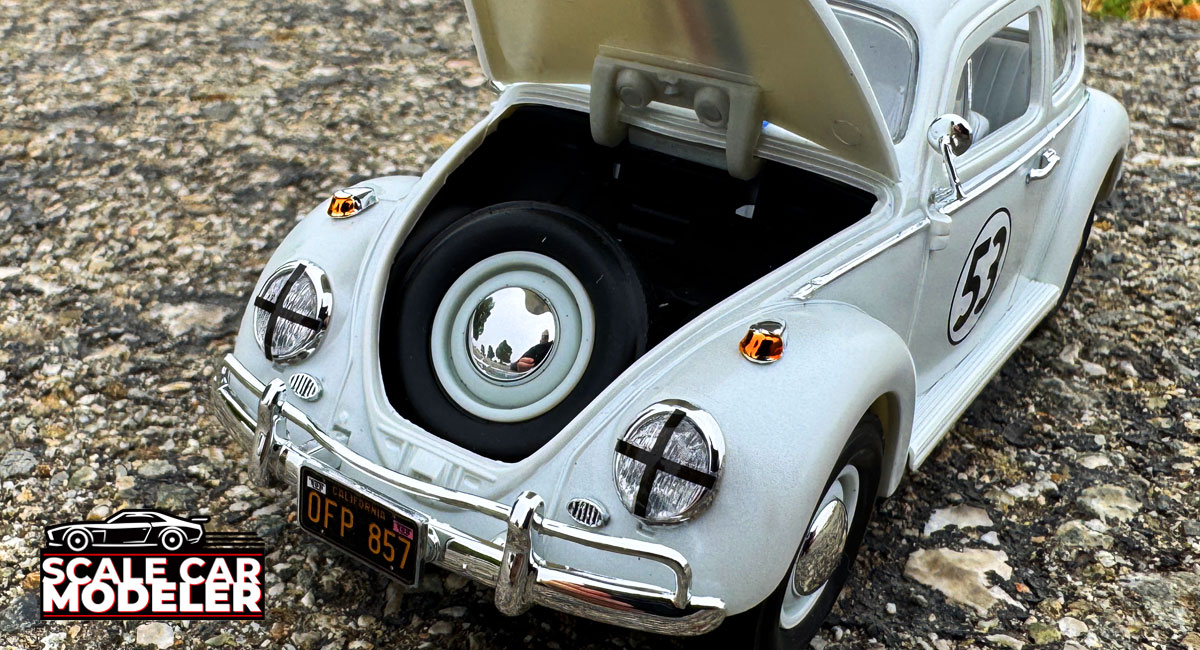
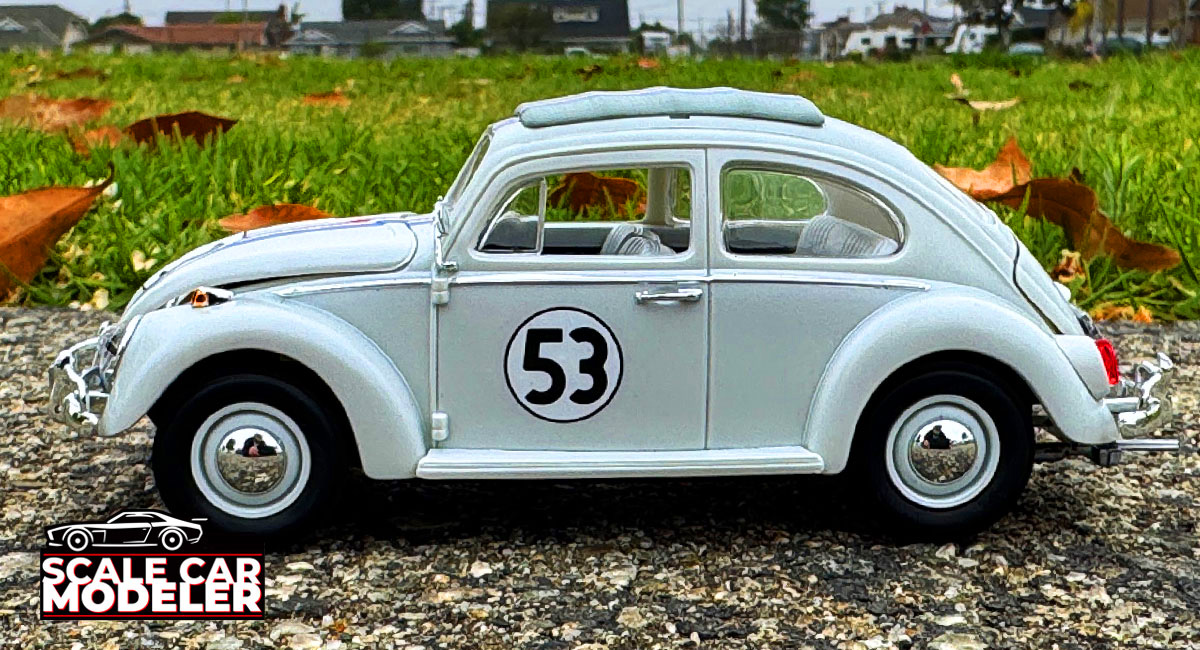 The exterior assembly was enjoyable, from the super-looking chrome bumpers to the separate door handles, marker lights and license plates. I do love that PL implemented opening trunk and engine covers to see all of your hard work underneath and, when closed, have a nice 'tight' fit - no big openings or crooked-ness. I did take a few liberties, however, painting the entire body Tamiya Pearl White (the Herbie I remember was white) as well as adding Bare Metal Foil to the raised molding (sides, front hood and truck) as well as the front and rear engine/trunk handles. Everything snapped together well (even though I added a light dab of glue - just in case) with the only thing ruining the overall look being the two 'holes' on either side of the canvas top. I wish there could have been a better solution for that but, all in all, this finished kit looks great.
:: Additional Notes
While the build was fun and didn't take much time at all, there are a few build notes I have that can make the process a little bit more enjoyable.
1. Paint parts with as little paint as possible. As I mentioned earlier, alot of this kit relies on a 'press fit' to secure parts together. If you add paint, you disintegrate those tolerances, which ends up with alot of drilling and filing to get things to mate.
2. During Step 1, make sure you place the glass in BEFORE the dashboard and inner front trunk area. The glass is designed to insert in the back and then snap in place up front. I built all of the front first (even added a dab of glue) and when installing the glass, found out it wouldn't fit. I had to cut the glass in half and assemble separately - not an easy task.
3. Also in Step 1, don't install the rear license plate just yet. At the end of the build, you'll be applying the red/white/blue stripes and one of those goes BEHIND the plate. Once you get the decals on, install the rear plate.
4. When inserting the metal attachment screws, DO NOT OVERTIGHTEN. The plastic is very soft and you can easily strip it out.
5. Earlier I suggested not fully installing the exhaust, but to leave it 'floppy' at that point. When it comes time to mate the chassis to the body, you need to be able to clip the body to a slot in the rear of the chassis, something that you won't be able to do if the exhaust is completely installed. Once clipped, the chassis folds down and can be locked in place by the screw (up front). At that point, you can press-fit the exhaust in place (and add a dab of glue is needed).
The Polar Light's Herbie the Love Bug is a simple kit with a relatively low parts count. Being based on a fictitious movie/TV personality (but was it??), it oozes a sense of easy and fun, both of which it actually is. The Snap Kit part of it makes it enticing (if you don't choose to do any paint work), but becomes questionable the moment you add any additional color. However, a single color, as-is Herbie is not something I ever imagined this would be, so I knew there would be some hand/custom building. And with that, I'm fine, because I feel I added a bit more value to this car and, in all honesty, LOVE the way it turned out
Instruction Manual
 Polar Lights Herbie the Love Bug Manual
Gallery